Pages

Friday, November 25, 2011

Kitchen Safety - Grease Fires

My dad recently sent me this video about kitchen safety. I couldn't watch the video for some reason, but I'm pretty sure this is the one he had sent.  I figured that it was definitely something that I should be writing about since some people still don't know what to do in the case of a grease fire. I was actually watching some cupcake show on the Food Network  yesterday when one of the women on the show was faced with this very common kitchen issue. She nearly blew up the sound stage which to say the least meant she didn't  handle the situation very well. Fire safety is pretty simple since there are really only TWO safe ways to put out a grease fire. The one thing you must always remember NEVER PUT WATER ON THE FIRE - I'm capitalizing the important stuff in case some of you are skimming over this post. Water can produce an explosive reaction which can be deadly. Baking flour or powder can produce a similar reaction - DO NOT TRY THIS PLEASE! A fire extinguisher is too powerful and can cause the grease to splash, it also doesn't have a cooling agent so fires can start up again after you think the flame has been extinguished. 
The only way to safely stop a grease fire is to ...
1. Place the metal lid on the pan or pot. 
2. Run a kitchen towel under water - then wring it out and place over the flame. 
3. * not as safe * sprinkling baking soda over the flame to extinguish 


Thursday, November 24, 2011

Happy Thanksgiving

I just couldn't resist! Found this image months ago and I've been patiently waiting to share it. Wishing all my American friends and family a very happy Thanksgiving. In honor of Yankee Turkey day I'll be roasting a giant turkey breast for dinner with garlic mashed potatoes, pan gravy and roasted cranberries. Sorry no stuffing... perhaps a sweet biscuit for dessert. 


I'm wondering what you'll all be eating at your dinners. If you have a chance an you want to share please let me know what's on the menu at your celebration.  

Wednesday, November 23, 2011

Cranberry & walnut bread pudding with dried cherries - Perfect for Thanksgiving

Since I totally missed the boat on Canadian Thanksgiving I figured it was only right to mention Thanksgiving since my American friends will be celebrating tomorrow. Thanksgiving is one of my absolute favorite fooding holidays. A few weeks back I came home form work with some left over brioche ends that were destined for the garbage. I couldn't bear the thought of throwing away such beautiful homemade bread so one of the chefs said I could go ahead and take it home.  My tummy was grumbling with excitement. I had just bought fresh cranberries and I knew I had eggs and cream in the fridge - a recipe started to build in my brain. I had never made bread pudding but I knew it couldn't be too difficult because it's basically just a french toast casserole. I consulted a few recipes on Epicurious to get a better idea of how many eggs to bread ratio. I'm pretty positive if you left out the sugar and added a sauteed onion and some fresh thyme, lardon, salt and pepper this would make an equally as delicious savory version. 
INGREDIENTS: 
4 cups brioche - ripped into pieces
5 eggs - whisked 
2 cups light cream 
1tsp cardamom 
1 lemon zested
1tsp vanilla extract 
1/3 cup cane sugar 
1/3 cup butter chopped
about 1/2 cup fresh cranberries 
about 1/2 cup dried cherries
about 1/2 cup chopped walnuts
pinch of salt
COOK: Pre heat oven to 350 degrees. Whisk eggs, cream, sugar, spices and zest. Add all dry ingredients together in a 9 inch (greased) loaf pan then pour in the wet. Drop the cubed butter all over the top and sprinkle with a little more sugar. Let stand for about 20 minutes then bake for 40. 
SERVE: I served as a dessert with a scoop of vanilla ice cream and concord grape sauce. You can serve this along side your turkey and the rest of the fixings. 
* If you want to freeze for a later date bake with out the butter and sugar. Let the loaf come to room temp - add the butter and sugar on cover with foil or plastic wrap and place in the freezer. When you are ready to use - refrigerate over night then let stand at room temp for about an hour before re-heating at 250 for 30- 45 mins. 

Tuesday, November 22, 2011

Kombucha - healthy tea or a refreshing glass of rotten champagne ?

A few weeks ago I had my very first experience with Kombucha - a fermented tea beverage that's naturally effervescent. My first impression  of this strange tasting beverage was that I wasn't sure If I liked the taste of it, or was grossed out. The only thing I can compare the flavor to is rotten champagne with a mild vinegar  aroma- sounds appetizing huh? It's definitely an acquired taste to say the least. 
I've since become totally obsessed with the drink since it's low in calories, and supposedly detoxifies the body and contains a plethora of other health benefits to boot. Kombucha is nothing new, it has been used all over Asia and Europe since the 19th century. Only recently has it become a trendy beverage in heath food stores across North America. 
It's kind of an expensive habit to get into most stores retail a bottle for 3+ dollars. To keep the cost down you can always brew it yourself. Although the process seems even more gross then the initial flavor of the tea. Basically you ferment a solid mass of yeast called the mushroom or mother for a month or so. The mass takes the shape of the container it's fermented in and is said to have a leathery calamari type texture. Ewww... When brewing your own Kombucha you must be very careful to keep everything clean and properly sealed to prevent mold. For now I'll just buy mine in the refrigerator section at Lady York and call it my guilty pleasure! 

Friday, November 18, 2011

Winning.... Versatile Blogger Awards


Good Friday my friends. This week has just been bursting with positive energy and love. My event Tuesday was a big success! People were raving about our food which was such fabulous news. I'm still beaming from the excitement As well the other day I was awarded the Versatile Blogger award from a very special and faithful reader named Julie - her blog is called Burnt Carrots and I'm also a big fan ;) Thank you Julie for this honor. 


The Versatile Blogger awards is a wonderful example of how the food blogging community really supports and encourages each other. We are all obviously inspired by similar things and each others way of presenting those things becomes a fresh way for us to see a topic from someone else's perspective.


I'm truly honored and thrilled to be the recipient of such an award. It's so nice to be recognized by your peers. Especially by peers who only know you by your work. As an artists we always critique works by saying "it really speaks for itself" This idea really resonates within the concept of a blogging award that aims to pay it forward.


Like winning Miss America or valedictorian, there are some things required by the recipient of the award. The Versatile Blogger asks for three in no particular order.
  1. Admit 7 things about yourself that many people do not know
  2. Pass on the award to 15 other food blogger (making sure to provide a link so others can find them too)
  3. Thank the person who gave you the award.
1. I'm actually a visual artist - classically trained with a Fine Arts degree from Concordia University with a Master in Painting. 
2. I'm highly allergic to cats however I can't bear to live with one or two furry friends in my home. 
3. Totally addicted to reality tv. The Real housewives of anything, Survivor, and obviously anything  on The Food Network. 
4.  I take a cooking class in every Country that I visit
5. A psychic once told me I'd be famous some day... I really want to be a brand! Books, shows, products you name it. 
6. Being naked is one of my favorite past  times - if you've ever gone on vacation with me you know this. 
 7. I direct a National Canadian sports show called The Rugby League Show on SportsNetworld

Now on to the 15 blogs I'd like to pass the award on to ... In no particular order
1. Teri & Jenny from Spoon Fork Bacon - http://spoonforkbacon.com/
2. Hanna from Honey & Jam - http://www.honeyandjam.com
3. Eden from Eden Eats - http://edeneats.tumblr.com/
4. Tami from Running with Tweezers - http://www.runningwithtweezers.com/about/
5. Tina from  Flourtrader - http://flourtrader.blogspot.com/
6. Clair at The Realistic Nutritionist -  http://nutritionfor.us/
7.  Mike from The Culinary Lens - http://www.theculinarylens.com/
8. Jill from Fat Girl in a Little Coat - http://fat-girlinalittlecoat.blogspot.com/
9. Erin from Dinners, Dishes and Desserts -  http://dinnersdishesanddesserts.blogspot.com/
10. S.V. from Sweet lil Piggy -  http://sweetlilpiggy.blogspot.com/
11. Emma from The Marion House Book - http://www.themarionhousebook.com/
13. Nicole from La Buena Vida http://nicolefranzen.blogspot.com
14. Liza from Nolachef - http://nolachef.wordpress.com/ 
15. Kelly form Eat Yourself Skinny - http://www.eat-yourself-skinny.com/

There you have it folks. Have a delicious weekend! xo

Thursday, November 17, 2011

Signiture Herbed Popcorn recipe by The Fooding Co.


In an effort to establish some signature party elements it's good to have some sort of go to dish or offering for your guests. In launching The Fooding Co. We decided we wanted to do something everyone would remember and be able to take with them at the end of the night. I thought developing a signature popcorn would be the perfect way to accomplish this. I was right, it was a huge hit. People went crazy for our herbed popcorn. 


Here's the low down...


INGREDIENTS:
Organic yellow kernel popcorn
canola + extra virgin olive oil 
salt
herb de provence - rough grind the herbs or buy a pre made blend
  • 3 Tablespoons dried thyme
  • 3 Tablespoons dried savory
  • 1 teaspoon dried basil
  • 1 teaspoon dried rosemary
  • 1/2 teaspoon dried lavender
  • 1/2 teaspoon fennel seeds
*If popping from scratch:
{ Per  cup of un-popped kernels use 2 tbs of oil (1tsp canola + 1tsp of olive oil) Heat oil in a large pot. Drop in one kernel to test the oil, If the oil starts to fry the kernel (little bubbles begin to form around it) drop in all of the remaining kernels and place the lid on the pot. Once the popcorn starts popping lower the heat slightly and shake the pot for a few seconds. Continue until you hear the popping begin to slow down, then turn the heat off. To finish the popcorn add a pinch of salt and herb blend and toss the popcorn for even distribution.
*If using pre popped corn: In a small pot bring 1/2 cup of olive oil to “boil” As soon as you see a tiny bubble or heat a snap turn the heat off and drop in 1 tsp of salt and 2 tbs of herb blend. Let the flavor of the herbs infuse in the oil for a few minutes before drizzling on the popcorn (use a small amount first and then add more if needed) – then toss everything together.

Monday, November 14, 2011

BREAKING NEWS


Hello my faithful fellow Tomato Snobs. I hope everyone had a great weekend! Mine has been very busy trying to get everything together for the official launch or birth of my new baby "The Fooding Co." 
This has really been a year in the making and I'm so proud and excited to tell you all about it. Tomorrow The Fooding Co. will be making it's first appearance on the Toronto social scene. I'm catering my friend Nicole's (from NEXT Image Consulting) event  called Fashion Flip.  This event has a great cause, which is to raise money and awareness for Sheena's Place


Over the last few years I have had a bunch of friends and family tell me that they would really love to learn how to cook. Some of those friends have even gone out and taken cooking lessons, but there is always the same problem in the end. When they return home to try and replicate what it is they've learned, they fall flat. Watching someone cook if you're a beginner doesn't always translate to learning how to use those methods in your own kitchen. I've seen this as an opportunity to create something new. The Fooding Co. offers in home cooking demos with topics that will be interesting and inspiring. Using ingredients you love with an emphasis on seasonal and local menus. My goal is to teach you how to gain confidence in your kitchen without relying on confusing recipes.


If you're in Toronto please come check it out - I'm offering a $30.00 introductory class. 


In addition The Fooding Co. will also offer catering, personal chef services, and prepared food delivery.

Thursday, November 10, 2011

The necessity of eating

Most food blogs plan what they are going to write about. They spend hours writing recipes, chopping dicing and photographing to get their readers a beautiful plate of food porn. I will admit I'm guilty of this from time to time, but I mostly blog and photograph what I'm having for dinner. Sometimes us food bloggers forget food is eaten out of necessity! Yes it can obviously be enjoyed but do we really always need to obsess over what's for dinner? This modest plate of food came from just that - necessity. I happened to be starving and needed to full my body with some nutrients. It most certainly wasn't the most delicious of blog worthy meal, but a necessary meal none the less.  

Rice bran pasta with cherry tomatoes, white beans, peas, chopped arugula and marinated artichoke with a simple olive oil garlic dressing and a splash of white balsamic vinegar. I got everything my body needed protein, fiber, carbs, vitamins and colourful veg. I guess a thrown together meal like this really illustrates the importance of having a decent pantry and fresh (or frozen) veg on hand. 

Tuesday, November 8, 2011

Pulled chicken tostada with chopped salsa fresca & avocado salad

I'm just crazy about Mexican food! I visit Mexico as often as I can, which usually translates to once a year if I'm lucky.  Truth be told I'd move there in a second if life permitted. This dinner was created they way all great dinners are created - from a combinations of leftovers and things that needed to be used before they started to go bad. As you know I always have my Mexican must have spices on hand to transform simple fresh (or not so fresh) ingredients into a delicious fiesta of the mouth. There's really no recipe for this meal, i'll simply explain my method and if you have similar ingredients you can create your own version of this delightful dish.


PULLED CHICKEN -
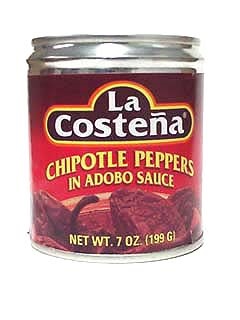
I poached two bone in chicken breasts and added a couple chipotles in adobo sauce to the poaching broth. (They are spicy so only use 1 if you don't love spice). They add a nice acidity and smoky flavor to the chicken. Let chicken rest for a few minutes before pulling or shredding off the bone.
BLACK BEANS - In a small pot simmer black beans (canned with liquid) with 1 crushed garlic clove, tsp cumin, paprika, tajin spice, and pinch of cayenne pepper (optional). Let cook for 15 mins or so and squeeze juice from 1 or 2 limes before serving.
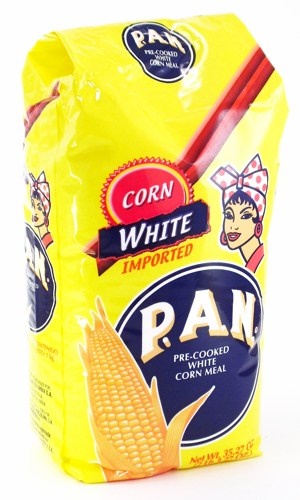
TOSTADA - Follow directions on the box of Harina PAN (pre-ccoked white corn meal). Divide into small balls - then flatten those balls into tostada shape. To cook heat a skillet with a small amount of vegetable oil and/or butter and fry on each side until golden.
CHOPPED SALSA FRESCA - Chop cucumber, tomatoes, onion, avocado, and cilantro or mint. Squeeze fresh lime juice and sprinkle with tajin spice, Miguelito Chamoy and a pinch of salt.

Monday, November 7, 2011

How to make vegetable soups - By MARK BITTMAN


My father in-law sent me this awesome recipe how to by Mark Bittman on how to easily cook vegetarian soups with out a rigid recipe. I'm a firm believer in that as well - I rarely follow recipes when creating one of my most beloved bowls of deliciousness . With a few good ingredients and a lot of love any soup will become a wonderful accomplishment. 


Bittman breaks it down in four categories. 
1. Creamy
2. Brothy
3. Earthy
4. Hearty


1- Creamy soups consist of pureed veg with addition of some butter and other dairy (milk, cream or yogurt).


2- Brothy soups start with a strained veg stock and other quick cooked veg added. 


3- Earthy soups contain beans and lentils.


4- Hearty soups build layers of flavor by sautéeing  first. 


You can take any of these soups from vegetarian to meaty wonders by using a chicken, veal or beef stock or  by adding cooked shredded protein at the end.  In my opinion heart soups would contain beans and or lentils and earthy would contain roasted root veg, but I wouldn't argue with Mark he's a foodie literary legend!

* FROM TOP TO BOTTOM: 
Creamy Spinach, Squash and Ginger, Curried Cauliflower, Bean Soup, Chickpea & Pasta, Spicy Black Bean, Minestrone, Mushroom and Tomato Garlic.